
Solar power is becoming more and more popular as a source of hope in a time when people are concerned about the environment and looking for long-lasting energy options.
Installing solar panels has never been more appealing to people who want to live in a more eco-friendly way, lower their carbon footprint, and save money on their energy bills.
But getting into residential solar energy takes a deep understanding of a number of different factors and things to think about. Before starting this life-changing journey, it’s important to understand the basic factors that affect whether or not installing solar panels at home is possible and how well they work.
In this article we will discuss some of the criteria to install solar panels for home to help make smart decisions and give them the power to use the endless potential of solar energy.
- Site Preparation
On the planned day of the installation, a group of installers will come to your home with solar panels, tools, and any other equipment they need. As soon as they get there, they start a full site survey to make sure the installation plan is correct and to deal with any pressing issues that may come up.
They are going to put up barriers and warning signs to make sure that everyone can work safely. This keeps the workplace safe and lets everyone know about any possible risks.
2. Roof Inspection
The first thing the team will do during the installation is check to see if your roof is structurally sound. Before you can decide if your roof can hold the weight of the solar panels, you need to take this important step. For those roofs that need fixes or reinforcements, those jobs are done first, before the project moves on.
There may be times when scaffolding is needed because the roof is hard to get to, like when it’s more than two stories high or when there isn’t an attic deck that can be used to get to the roof.
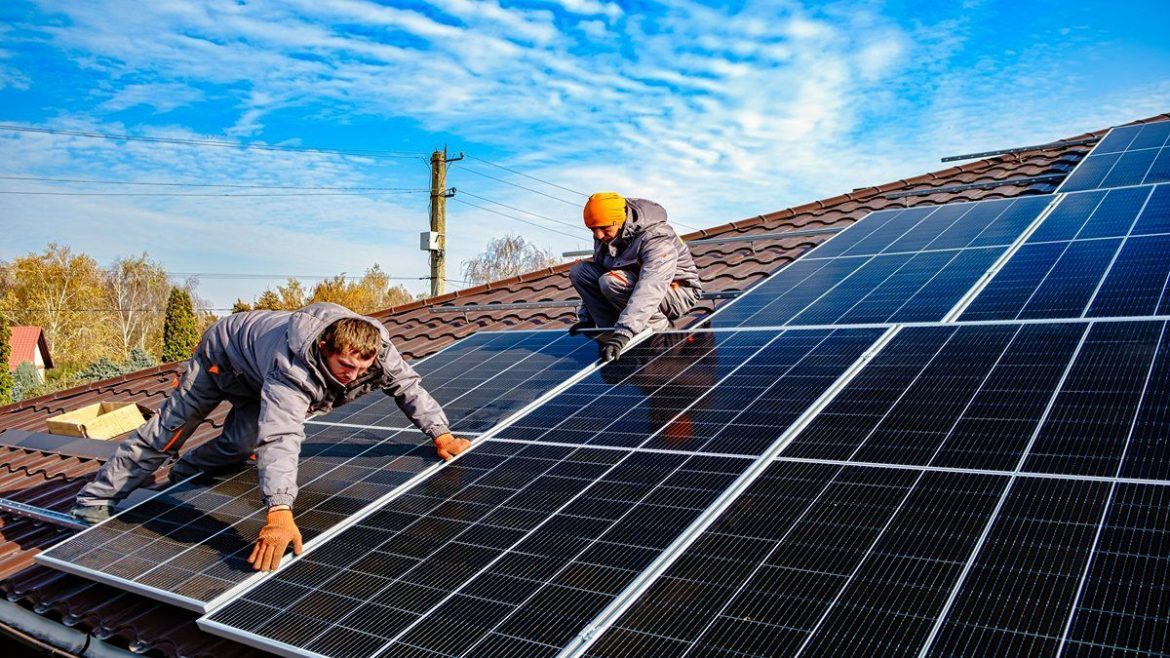
3. Mounting and Racking
After the installation team has been given permission to start, they will proceed to attach the racking system onto your roof of your building. For the purpose of attaching the solar panels in their respective positions, the racking system offers a robust foundation.
The installation team will take the necessary procedures to guarantee that the racking system is firmly attached to your roof, so preventing any potential damage or leaks from occurring. The manner in which mounting frames are attached to your roof is going to be determined by the type of roof that you have.
Tile Roofs
In the case of traditional tile roofs, the tiles are briefly taken off to make it easier to hang the mounting frame on the roof. Once that is done, the roof tiles are put back where they were originally placed.
Metal Roofs
When it comes to metal roofing, generally speaking, they are fastened right onto the seams of your roof, without any penetration taking place.
In certain circumstances, and depending on the condition of your roof, your solar installer may additionally recommend roof waterproofing in order to minimize roof leakages that may be created by installing the mounting frame in an accidental manner.
4. Solar Panel Installation
Solar panel installation are then meticulously fitted on the framework after the racking system has been prepared and installed. Every solar panel is securely attached to the rack system in order to ensure that it can resist a wide range of weather conditions and maintain its stability over the long term.
5. Wiring and Inverter Installation
After the solar panels have been installed in a safe and secure manner, the installation team will proceed to link them by means of a network of electrical wiring. This cable is meticulously routed from each panel to an inverter, which is often situated in close proximity to your primary electrical panel or distribution board within your home.
The inverter is responsible for converting the direct current (DC) electricity that is produced by the solar panels into alternating current (AC) electricity, which is the common form of electricity that is utilized in your home. Putting your inverter indoors is something that installers frequently recommend.
This option makes it easier for your inverter to establish a reliable Wi-Fi connection, which is essential for the device’s operation. Additionally, if the inverter is kept inside, in a colder atmosphere, it can increase its efficiency by one to three percent and extend its lifespan. If you are interested in learning more about inverters, you can read our guide to solar inverters.
6. Electrical Wiring and Connections
After the inverter has been installed, the team will then make the necessary electrical connections between the inverter and the electrical system of your home. Specifically, this entails making certain that the electricity supplied by solar panels can be easily incorporated into the power supply that is already in place.
It is possible to install a bidirectional meter in order to monitor not only the amount of power that is drawn from the grid but also the amount of excess electricity that is sent back into the grid (provided that net metering is available).
7. Final Inspection and Testing
A thorough check will be carried out by the installers once all of the components have been installed and the electrical connections have been secured. This inspection will ensure that the system complies with all of the quality and safety standards, as well as providing the optimal functionality.
Electricity testing is carried out by licensed electricians to ensure that the system is producing the expected amount of electricity and that all of the electrical connections are in good working order.
8. Permit and Utility Interconnection
Submitting the relevant permissions to SP PowerGrid is done when the inspection and approval procedure has been completed. Once SP PowerGrid gives its clearance, the solar photovoltaic system will start producing electricity without any interruptions, allowing it to be smoothly integrated into your existing electrical setup.
9. Cleanup
After the completion of the installation and the activation of your solar panel system, the team will clean up the work area by removing any debris or materials that may have been scattered around.
They ensure that there is no mess or hazards left behind once the installation is complete by leaving your property in the same condition it was in before the installation.
10. Orientation and System Handover
The installation staff will make sure that you are well-informed about the monitoring and maintenance of your solar panel system before they leave. It is their responsibility to help you through the process of accessing system data and, if available, utilizing incentives or rebates for the production of solar energy.
They include in-depth information regarding the operation of the system, the requirements for necessary maintenance, and the particulars of the warranty. In order to ensure that your solar system is being monitored effectively, you are strongly urged to ask questions and receive hands-on instructions.
Closing Thoughts
When it comes to the installation of solar power system in Singapore, it is imperative to demonstrate compliance with a variety of legislation and requirements. In addition, you are needed to register with SP Services in order to sell any excess solar energy that you generate back to the grid.
If, on the other hand, you are not contemplating a do-it-yourself solar installation in Singapore, which is something that we do not suggest, then these worries should not cause you too much concern.
Professional, qualified solar installers have the skills to do a good job installing your solar panel system. It goes without saying that they also know the basic safety rules and steps that all solar installations in Singapore must follow.